| February 2, 2008 | HOME | ||||||||
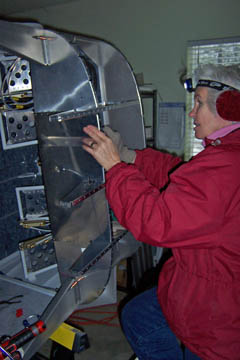
Now that I'm picking up a little speed at the building process again, I'm falling behind on my website. I can't help it, building comes first. Everything is complicated by the fact that we only have electricity for a few hours in the morning and in the evening. I can build without electricity, but updating the website requires it because I don't want to bother with the laptop. I am beginning to put together the structure to support the panel and the forward skin.
This is pretty routine airplane building and back to fitting and rivetting and all that. I don't intend to actually rivet yet and I really don't want to install the skin yet, because I want to keep the area open in order to facilitate wiring.
I am using clecos to put this whole forward structure together so I can check fit and make up the little braces that are called for in the plans.
This is an area where I find myself assembling, measuring and taking apart. It isn't difficult, but it is a little tedious.
I do like making the little parts like the braces and angles that support the panel.
I do have to admit that it is a little more difficult when I have to wear mittens to keep my hands warm while I work! I do miss my nice heated shop!
This brace ties to the windscreen frame support and the angle that runs forward to the firewall. It is simply cut from flat stock and drilled.
|
|||||||||
I made the angle piece that connects tot he firewall support and got the proper bend in it. It only needs to be drilled and rivetted in place.
Taking a break from cabin work, I finally got around to re-packing the wheel bearings and mounting the wheel and tire on the axle. You tighten bearings while turning the wheel until it just snugs up (you feel resistance turning the wheel) and back off to the first position that lets you put a cotter pin in place.
Secure the cotter pin and the wheel and tire are attached.
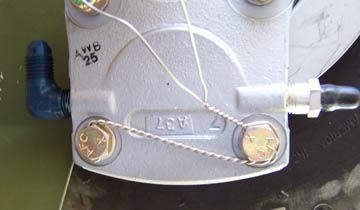
I took apart the brake calipers for installation on the wheel. I had previously reversed the fittings on one so that they would fit both sides.
The little (yeah, they are little) brake pads are just like automotive brake pads in miniature.
Like automotive disk brake calipers, these float and are really only held in place by the brake rotor. The 2 bolts go back in and are appropriately torqued.
The brake caliper installation is wrapped up with a little safety wire and we have brakes! Oops, not yet -- we still need the brake lines and fluid and to bleed the system and that's for another day.
Previous Day | HOME | Next Day |
|||||||||
| ... | |||||||||